
TL;DR
Acoustic dampening reduces reflections inside your closet, but noise leaks through barriers and gaps. Proper mic placement and ventilation are key. A well-ventilated, treated closet can be a perfect, budget-friendly recording spot.
Ever tried recording vocals or voice-overs in a closet? It’s a game of trade-offs. The closet’s small, enclosed nature makes it ideal for controlling reflections, but it’s no magic bullet for noise. Acoustic dampening. The real secret? You don’t just treat the space— you control sound at the source, and where it leaks.
This article is about how to make your closet rig sound better and stay quiet when you need it. We’ll cover the difference between dampening and sealing, where to put your mic for the cleanest recordings, and the best ways to ventilate a closet rig without turning it into a noisy furnace.
Acoustic dampening
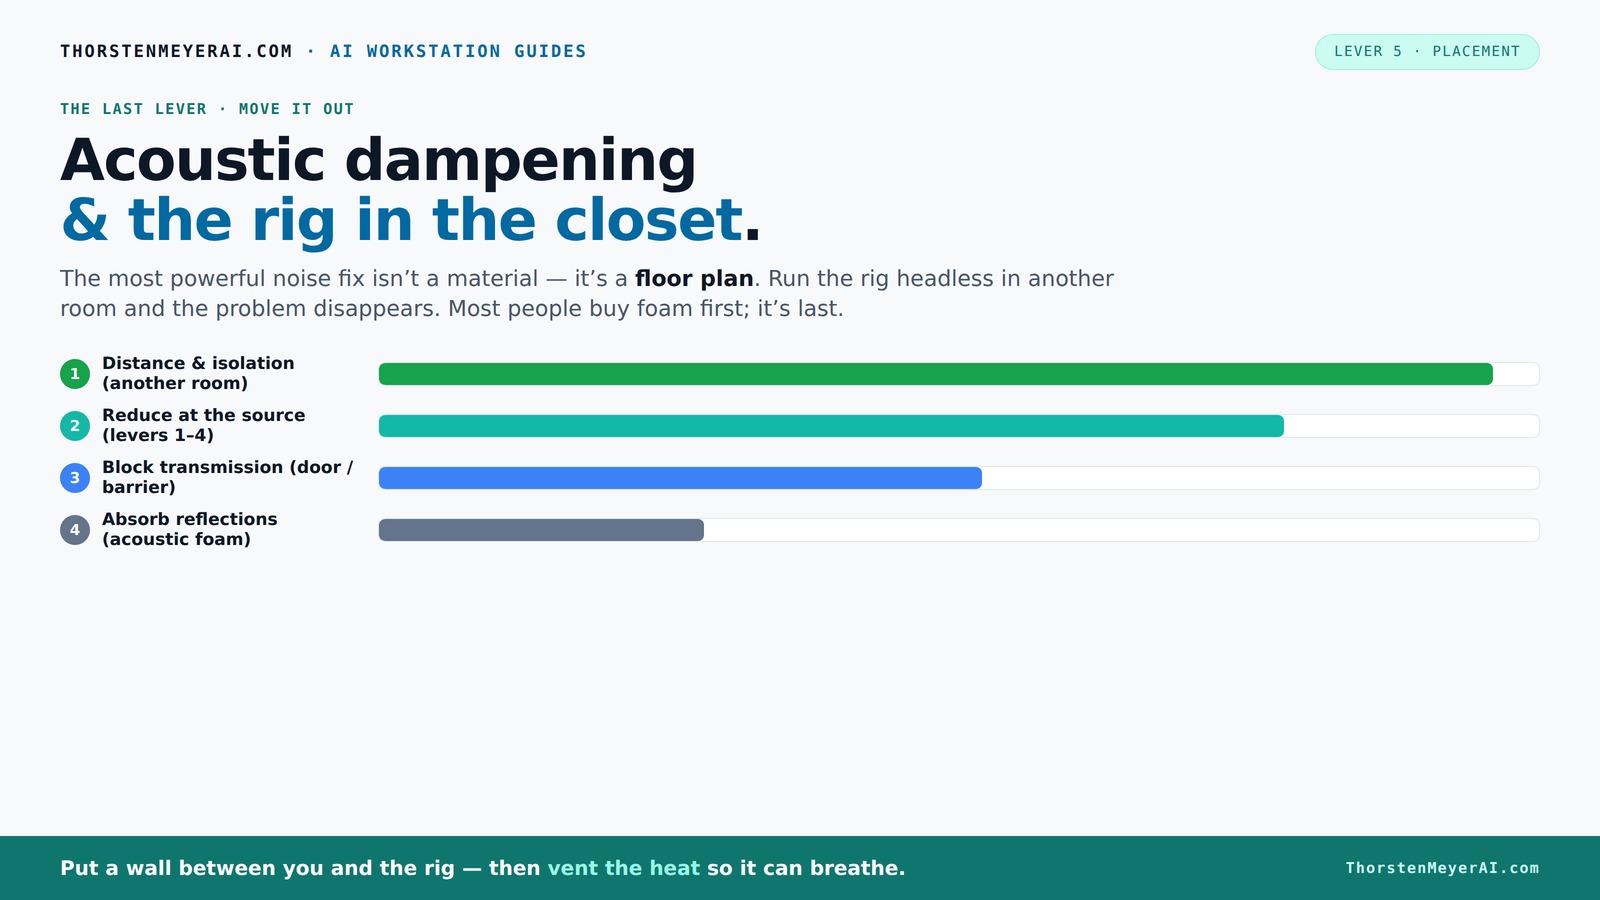
& the rig in the closet.
The most powerful noise fix isn’t a material — it’s a floor plan. A rig you can’t hear because it’s in another room beats any amount of foam. Tap the approaches in Part 1 to see what actually works.
(another room)
(levers 1–4)
(door / barrier)
(acoustic foam)
Contain the noise, not the heat
Key Takeaways
- Treat reflection points and seal gaps for the best sound inside your closet.
- Mic placement is more crucial than adding foam—place the mic away from reflective surfaces.
- Ventilate actively—use quiet fans or ducts—to keep your rig cool and avoid heat buildup.
- A 'rig in the closet' works best when combined with proper acoustic treatment and ventilation.
- Don’t rely on foam alone—address sound leaks and low-frequency issues for professional results.
soundproofing foam panels for closet recording
As an affiliate, we earn on qualifying purchases.
As an affiliate, we earn on qualifying purchases.
What’s the difference between acoustic dampening and soundproofing?
Acoustic dampening is about controlling reflections inside your space. Think foam panels, blankets, or rugs that soften echo and flutter echo. Soundproofing, on the other hand, blocks sound from escaping or entering. It’s sealing gaps, adding mass, and building barriers—like a door seal or a thick wall.
Understanding this distinction is crucial because many assume that adding foam panels alone will make a space soundproof. Acoustic dampening helps reduce echo but doesn’t block sound leaks. In reality, dampening reduces echo and improves clarity but does little to prevent sound leaks. Conversely, soundproofing involves creating barriers that stop sound from passing through walls, doors, or gaps. The tradeoff is that soundproofing often requires more effort and can be costlier, but it’s essential if you need to prevent noise from disturbing others or leaking out.
For example, hanging foam in your closet reduces flutter echo, making your voice clearer on recordings. But sealing gaps around the door or adding a heavy door sweep prevents sound from escaping—an essential step if you want to keep the noise contained. Most noise issues in a closet stem from leaks rather than internal reflections, so understanding this helps prioritize your efforts effectively.
microphone isolation shield for vocals
As an affiliate, we earn on qualifying purchases.
As an affiliate, we earn on qualifying purchases.
Where should you put acoustic panels and blankets for the best sound?
The goal is to treat the surfaces that cause the most reflections—primarily behind and around your mic. Acoustic treatment is key for clear recordings. Placing acoustic panels on walls directly behind the microphone and at reflection points on the side walls helps absorb sound waves that bounce back into the mic, reducing echo and harshness. The ceiling and door are also critical zones because sound can bounce in multiple directions, creating unwanted room sound in your recordings.
In a typical closet, a 2-inch thick foam panel placed on the wall behind your mic can significantly reduce flutter echo. Adding blankets or soft materials on the door and ceiling further dampens reflections. For low-end control, corner bass traps are invaluable—they absorb standing waves and bass buildup that can muddy recordings, especially in small, enclosed spaces.
For example, mounting foam panels at the mirror points—where reflections bounce back to the mic—can make a noticeable difference in clarity and warmth of your recordings. The key is to identify reflection points and treat those areas directly, which yields the best results for a small space.
acoustic dampening blankets for home studio
As an affiliate, we earn on qualifying purchases.
As an affiliate, we earn on qualifying purchases.
How to position your mic for the cleanest recordings in a closet
- Identify the reflection points—use a mirror to find where reflections bounce into the mic. This helps you target treatment more effectively and avoid unnecessary clutter. Reflection points are critical for optimal placement.
- Place the mic at least 6-12 inches away from walls or reflective surfaces to reduce direct sound reflections that can cause comb filtering and coloration of your recordings.
- Point the mic away from reflective surfaces whenever possible. Angling the mic can help minimize the pickup of room reflections that color your sound.
- Use a reflection filter or shield to block sound from behind the mic. This isolates your source and reduces room noise pickup, resulting in a cleaner, more professional recording.
Imagine you’re recording a vocal. Position the mic so it’s not right against the wall, and angle it slightly away from reflective surfaces. This simple step prevents unwanted echoes from being captured, which often requires less treatment and results in a more natural sound. Proper mic placement is perhaps the most cost-effective way to improve quality without extensive treatment, especially in small spaces.
ventilation fan for quiet recording booth
As an affiliate, we earn on qualifying purchases.
As an affiliate, we earn on qualifying purchases.
Where to treat the door, floor, and corners for maximum effect?
The door and floor are often overlooked but are crucial for both sound isolation and controlling reflections. Sealing gaps around the door with weatherstripping or acoustic sealant prevents sound leaks that can disturb neighbors or record unwanted noise. Soundproofing is essential for isolation. Adding a thick rug or carpet on the floor absorbs footstep noise and helps reduce reflections bouncing off hard surfaces, which can make recordings sound harsh or echoey.
Corners are the low-frequency trouble spots because standing waves naturally accumulate there, causing bass buildup that muddies your recordings. Installing bass traps—either commercial panels or DIY solutions like rolled-up towels—can dramatically improve low-frequency clarity. Properly treating corners prevents low-end boominess and creates a more balanced sound profile inside your space.
For example, sealing gaps around the door and placing a thick rug can significantly improve sound isolation, making your recordings clearer and more professional. Addressing these areas ensures that both sound leakage and internal reflections are minimized, giving you a more controlled environment.
How to handle ventilation without turning your closet into a sauna
Ventilation is one of the biggest challenges in a sealed closet. Without proper airflow, heat quickly builds up, risking overheating your equipment and creating discomfort or even damaging your gear. The tradeoff is between maintaining silence and ensuring adequate cooling. Active ventilation solutions—like quiet fans, ducted airflow, or small vents—are essential to strike this balance.
Using a low-noise exhaust fan or a duct system can effectively draw hot air out while bringing in cooler air, preventing heat buildup without introducing significant noise. Ventilation solutions are vital for a comfortable setup. For example, a 120mm silent fan pulling air through a duct in the closet wall can keep temperatures stable even during long recording sessions. Proper placement and selection of quiet fans are critical because noisy fans defeat the purpose of a quiet recording space.
Check out [this guide](https://thorstenmeyerai.com/reduce-heat-noise-ai-workstation/) for more detailed cooling solutions tailored for enclosed rigs. Implementing effective ventilation not only preserves your equipment's longevity but also maintains a comfortable environment, ensuring consistent performance and sound quality over extended periods.
DIY closet booth tricks: making your space sound great without breaking the bank
Many creators build DIY closet booths using layered materials to achieve a balance between sound quality and budget. Hanging blankets, foam panels, and removable curtains are popular options because they’re cost-effective and easy to install or remove. These solutions allow for quick adjustments, making your setup adaptable to different recording needs.
Focus your efforts on treating the main reflection points with foam or soft materials, sealing gaps around doors and outlets, and adding a thick rug for low-frequency absorption. Adding a small, quiet fan for ventilation can further improve comfort without sacrificing sound quality. This hybrid approach helps you achieve a more controlled acoustic environment without extensive construction or permanent modifications.
For example, a simple setup with foam panels on walls, blankets on the door, and a small vent fan can produce studio-quality recordings in a closet, especially when combined with proper mic placement and sealing. The key is to balance treatment and practicality, creating an environment that is both sound-friendly and flexible.
Common mistakes that ruin your closet rig’s sound quality
Failing to treat the reflection points is a big one. Many think foam alone will solve everything, but reflection control is only part of the story. Over-sealing the space without proper ventilation causes heat buildup, which can lead to equipment overheating and increased ambient noise from fans or cooling devices. Ignoring gaps around outlets, doors, or windows allows sound leaks that undermine your efforts at soundproofing.
Another common mistake is using cheap, thin foam that doesn’t absorb low frequencies or ignoring the importance of bass traps in corners. These small leaks and poor low-frequency treatment can cause muddy recordings and reduce clarity. Additionally, mic placement matters—placing the mic too close to reflective surfaces or neglecting room acoustics can make even the best treatment sound muffled or boomy.
Understanding these pitfalls helps you focus on the most impactful improvements—like sealing gaps, treating reflection points, and positioning your mic properly—leading to a significant boost in overall sound quality and noise isolation.
Frequently Asked Questions
What’s the biggest mistake people make with closet sound treatment?
Many rely solely on foam panels and ignore reflection points or gaps around the door. This leaves echo and sound leaks, ruining the quality of recordings and noise isolation.Can I just use blankets and rugs instead of acoustic panels?
Yes, but it depends. Thick blankets and rugs help absorb reflections, but for low frequencies and soundproofing, dedicated panels and sealing are more effective. Combining both gives the best results.How much treatment do I really need in a small closet?
For most small closets, a few panels on reflection points, bass traps in corners, and sealing gaps are enough. Over-treating can be unnecessary—focus on the main reflection and leak points.Will a closet booth sound professional enough for voice-over work?
Absolutely. With proper treatment, mic placement, and ventilation, a closet can provide excellent quality for voice work, especially when you’re aiming for a natural, warm sound.What’s the best way to ventilate a closet without making noise?
Use low-noise exhaust fans or ducted airflow systems. Proper ventilation prevents heat buildup without introducing sound that leaks into your recordings.Conclusion
Creating a quiet, professional-sounding closet rig isn’t about stuffing it with foam. It’s about smart placement—both of your mic and your treatment materials—and making sure hot air can escape. With the right balance, your closet can become a studio powerhouse.
Remember, the goal is to control what you hear and what leaks out. Focus on sealing gaps, placing your mic thoughtfully, and ventilating properly. That’s how a simple closet turns into a serious recording space—quiet, cool, and clear.